2
Setting Up
| 2.1 Windows Setup (Optional) | 25 |
| 2.2 Installing Java | 25 |
| 2.3 Installing Ammonite | 26 |
| 2.4 Installing Mill | 30 |
| 2.5 IDE Support | 32 |
$ amm
Loading...
Welcome to the Ammonite Repl 2.2.0 (Scala 2.13.2 Java 11.0.7)
@ 1 + 1
res0: Int = 2

@ println("hello world" + "!" * 10)
hello world!!!!!!!!!!
</> 2.1.scala
Snippet 2.1: getting started with the Ammonite Scala REPL
In this chapter, we will set up a simple Scala programming environment, giving you the ability to write, run, and test your Scala code. We will use this setup throughout the rest of the book. It will be a simple setup, but enough so you can get productive immediately with the Scala language.
Setting up your development environment is a crucial step in learning a new programming language. Make sure you get the setup in this chapter working. If you have issues, come to the online chat room https://www.handsonscala.com/chat to get help resolving them so you can proceed with the rest of the book in peace without tooling-related distractions.
We will be installing following tools for writing and running Scala code:
- Java, the underlying runtime which Scala runs on
- Ammonite, a lightweight REPL and script runner
- Mill, a build tool for larger Scala projects
- Intellij IDEA, an integrated development environment that supports Scala
- VSCode, a lightweight text editor with support for Scala
These tools will be all you need from your first line of Scala code to building and deploying production systems in Scala.
2.1 Windows Setup (Optional)
If you are on Windows, the easiest way to get started using Scala is to use the Windows Subsystem for Linux 2 (WSL2) to provide a unix-like environment to run your code in. This can be done by following the documentation on the Microsoft website:
WSL2 allows you to choose which Linux environment to host on your Windows computer. For this book, we will be using Ubuntu 18.04 LTS.
Completing the setup, you should have a Ubuntu terminal open with a standard
linux filesystem and your Windows filesystem available under the /mnt/c/
$ cd /mnt/c

$ ls
'Documents and Settings'    PerfLogs        'Program Files (x86)'   Recovery
'Program Files'             ProgramData     Recovery.txt            Users
...
</> 2.2.bash
The files in /mnt/c/
-
You can edit your code on Windows, and run it through the terminal on Linux.
-
You can generate files on disk on Linux, and view them in the Windows Explorer
Many of the chapters in this book assume you are running your code in WSL2's Ubuntu/Linux environment, while graphical editors like IntelliJ or VSCode will need to be running on your Windows environment, and WSL2 allows you to swap between Linux and Windows seamlessly. While the Scala language can also be developed directly on Windows, using WSL2 will allow you to avoid compatibility issues and other distractions as you work through this book.
2.2 Installing Java
Scala is a language that runs on the Java Virtual Machine (JVM), and needs Java
pre-installed in order to run. To check if you have Java installed, open up your
command line (The Terminal app on Mac OS-X, WSL2/Ubuntu on Windows) and type
in the java command. If you see the following output (or something
similar) it means you already have Java installed:-version
$ java -version
openjdk version "11.0.7" 2020-04-14
OpenJDK Runtime Environment AdoptOpenJDK (build 11.0.7+9)
OpenJDK 64-Bit Server VM AdoptOpenJDK (build 11.0.7+9, mixed mode)
</> 2.3.bash
If you already have Java, you can skip forward to Installing Ammonite (2.3). On the other hand, if you see something like the following, it means you do not have Java installed yet:
$ java -version
-bash: java: command not found
</> 2.4.bash
You can download and install a version of the JVM (we will be using version 11 in our examples) via one of the following websites:
- https://adoptopenjdk.net/?variant=openjdk11&jvmVariant=hotspot
- https://docs.aws.amazon.com/corretto/latest/corretto-11-ug/downloads-list.html
The installation instructions vary per operating system, but there are
instructions provided for Windows, Mac OS-X, and different flavors of Linux
(.deb.rpmjava command
correctly produces the above output.-version
If you are installing Java through the terminal, e.g. on a WSL Ubuntu distribution or on a headless server, you can do so through your standard package manager. e.g. on Ubuntu 18.04 that would mean the following commands:
$ sudo apt update

$ sudo apt install default-jdk

$ java -version
openjdk version "11.0.6" 2020-01-14
OpenJDK Runtime Environment (build 11.0.6+10-post-Ubuntu1ubuntu118.04.1)
OpenJDK 64-Bit Server VM (build 11.0.6+10-post-Ubuntu-1ubuntu118.04.1, ...)
</> 2.5.bash
Java versions have a high degree of compatibility, so as long as you have some version of Java installed that should be enough to make the examples in this book work regardless of which specific version it is.
2.3 Installing Ammonite
On Mac OS-X, Linux, and Windows WSL2, we can install Ammonite via the following command line commands:
$ sudo curl -L https://github.com/lihaoyi/Ammonite/releases/download/2.2.0/2.13-2.2.0 \
  -o /usr/local/bin/amm

$ sudo chmod +x /usr/local/bin/amm

$ amm
</> 2.6.bash
This should open up the following Ammonite Scala REPL:
Loading...
Welcome to the Ammonite Repl 2.2.0 (Scala 2.13.2 Java 11.0.7)
@
</> 2.7.scala
Once you see this output, it means you are ready to go. You can exit Ammonite
using Ctrl.-D
On Max OS-X, Ammonite is also available through the Homebrew package manager via
brew install ammonite-repl
2.3.1 The Scala REPL
The Ammonite REPL is an interactive Scala command-line in which you can enter code expressions and have their result printed:
@ 1 + 1
res0: Int = 2

@ "i am cow".substring(2, 4)
res1: String = "am"
</> 2.8.scala
Invalid code prints an error:
@ "i am cow".substing(2, 3)
cmd0.sc:1: value substing is not a member of String
did you mean substring?
val res0 = "i am cow".substing(2, 3)
                      ^
Compilation Failed
</> 2.9.scala
You can use tab-completion after a .
@ "i am cow".<tab>...
exists maxOption stripSuffix ||
filter min stripTrailing
filterNot minBy subSequence
find minByOption substring
@ "i am cow".sub<tab>"i am cow".substring<tab>def substring(x$1: Int): String
def substring(x$1: Int, x$2: Int): String
</> 2.10.scalaIf a REPL command is taking too long to run, you can kill it via Ctrl:-C
@ while (true) { Thread.sleep(1000); println(1 + 1) } // loop forever
2
2
2
2
2
<Ctrl-C>
Interrupted! (`repl.lastException.printStackTrace` for details)

@
</> 2.11.scala
2.3.2 Scala Scripts
In addition to providing a REPL, Ammonite can run Scala Script files. A Scala
Script is any file containing Scala code, ending in .sc
For example, we can create the
following file myScript, using any text editor of your choice
(Vim, Sublime Text,
VSCode, etc.):.sc
myScript.scprintln</> 2.12.scala(1+1)// 2println("hello"+" "+"world")// hello worldprintln(List("I","am","cow"))// List(I,am,cow)
Note that in scripts, you need to println each expression since scripts do not
echo out their values. After that, you can then run the script via amm myScript:.sc
$ amm myScript.sc
Compiling /Users/lihaoyi/myScript.sc
2
hello world
List(I, am, cow)
</> 2.13.bash
The first time you run the script file, it will take a moment to compile the script to an executable. Subsequent runs will be faster since the script is already compiled.
2.3.2.1 Watching Scripts
If you are working on a single script, you can use the amm or -wamm
command to watch a script and re-run it when things change:--watch
$ amm -w myScript.sc
2
hello world
am
Watching for changes to 2 files... (Ctrl-C to exit)
</> 2.14.bash
Now whenever you make changes to the script file, it will automatically get re-compiled and re-run. This is much faster than running it over and over manually, and is convenient when you are actively working on a single script to try and get it right.
You can edit your Scala scripts with whatever editor you feel comfortable with: IntelliJ (2.5.1), VSCode (2.5.3), or any other text editor.
2.3.3 Using Scripts from the REPL
You can open up a REPL with access to the functions in a Scala Script by running
amm with the --predef
myScript.sc</> 2.15.scaladefhello(n:Int)={"hello world"+"!"*n}
You can then open a REPL with access to it as follows:
$ amm --predef myScript.sc
Loading...
Welcome to the Ammonite Repl 2.2.0 (Scala 2.13.2 Java 11.0.7)
@ hello(12)
res0: String = "hello world!!!!!!!!!!!!"
</> 2.16.bash
This is convenient when your code snippet is large enough that you want to save it to a file and edit it in a proper editor, but you still want to use the Scala REPL to interactively test its behavior.
Note that if you make changes to the script file, you need to exit the REPL
using Ctrl and re-open it to make use of the modified script. You can also
combine -D--predef--watch-wCtrl
it will automatically restart the REPL if the script file has changed.-D
2.4 Installing Mill
Mill is a build tool for Scala projects, designed for working with larger Scala projects. While the Ammonite REPL and scripts are great for small pieces of code, they lack support for things like running unit tests, packaging your code, deployment, and other such tasks. For larger projects that require such things, you need to use a build tool like Mill.
2.4.1 Mill Projects
The easiest way to get started with Mill is to download the example project:
$ curl -L https://github.com/lihaoyi/mill/releases/download/0.8.0/0.8.0-example-3.zip \
  -o example-3.zip

$ unzip example-3.zip

$ cd example-3

$ find . -type f
./build.sc
./mill
./foo/test/src/ExampleTests.scala
./foo/src/Example.scala
</> 2.17.bash
You can see that the example project has 4 files. A build file that
contains the project definition, defining a module .scfoo with a test module
test inside:
build.sc</> 2.18.scalaimportmill._,scalalib._objectfooextendsScalaModule{defscalaVersion="2.13.2"objecttestextendsTests{defivyDeps=Agg(ivy"com.lihaoyi::utest:0.7.4")deftestFrameworks=Seq("utest.runner.Framework")}}
The test module definition above comes with a dependency on one third party
library: ivy. We will see other libraries as we
progress through the book and how to use them in our Mill projects."com.lihaoyi::utest:0.7.4"
The Scala code for the foo module lives inside the foo folder:/src/
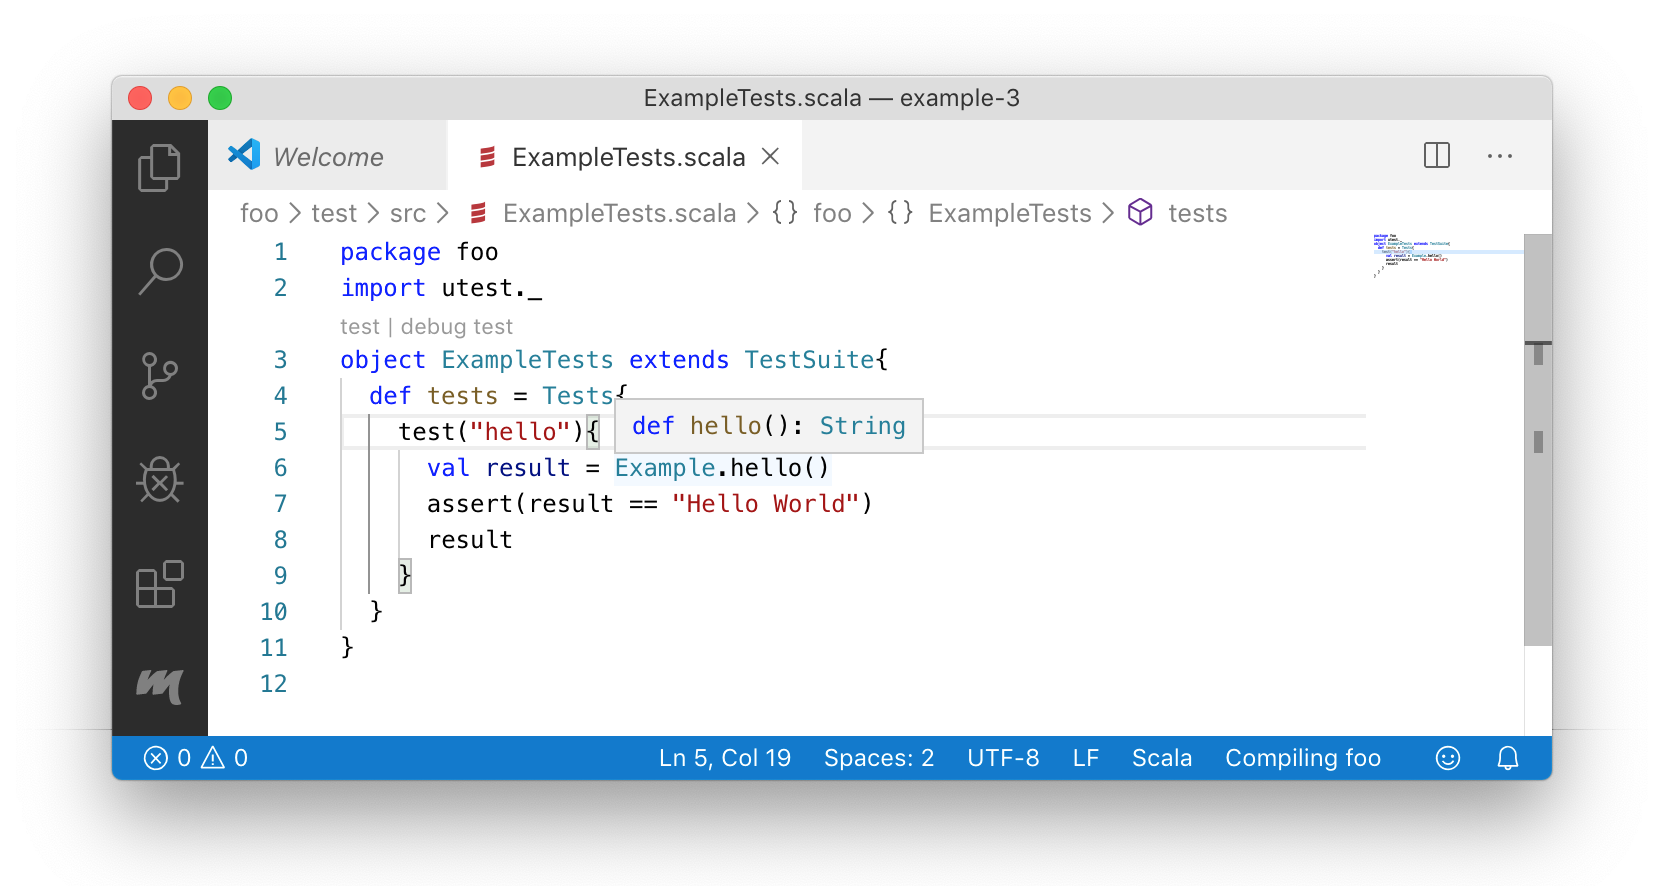
foo/src/Example.scala</> 2.19.scalapackagefooobjectExample{defmain(args:Array[String]):Unit={println(hello())}defhello():String="Hello World"}
While the Scala code for the foo test module lives inside the
.testfoo folder:/test/src/
foo/test/src/ExampleTests.scala</> 2.20.scalapackagefooimportutest._objectExampleTestsextendsTestSuite{deftests=Tests{test("hello"){valresult=Example.hello()assert(result=="Hello World")result}}}
Lastly, the example project contains a mill file. You can use the mill file
to compile and run the project, via ./mill ...
$ ./mill foo.compile
Compiling /Users/lihaoyi/test2/example-1/build.sc
...
7 warnings found
[info] Compiling 1 Scala source to /Users/lihaoyi/test2/example-1/out/foo/compile/dest...
[info] Done compiling.

$ ./mill foo.run
Hello World
</> 2.21.bash
Note that the first time you run ./mill./mill foo.compile./mill foo.run./mill foo.run
To use Mill in any other project, or to start a brand-new project using Mill, it
is enough to copy over the mill script file to that project's root directory.
You can also download the startup script via:
$ curl -L https://github.com/lihaoyi/mill/releases/download/0.8.0/0.8.0 -o mill

$ chmod +x mill
</> 2.22.bash
2.4.2 Running Unit Tests
To get started with testing in Mill, you can run ./mill foo.test
$ ./mill foo.test
-------------------------------- Running Tests --------------------------------
+ foo.ExampleTests.hello 10ms  Hello World
</> 2.23.bash
This shows the successful result of the one test that comes built in to the example repository.
2.4.3 Creating a Stand-Alone Executable
So far, we have only been running code within the Mill build tool. But what if
we want to prepare our code to run without Mill, e.g. to deploy it to production
systems? To do so, you can run ./mill foo.assembly
$ ./mill foo.assembly
This creates an out file that can be distributed, deployed and run without
the Mill build tool in place. By default, Mill creates the output for the
.jarfoo task in .assemblyout, but you can use /foo/assembly/dest./mill show
$ ./mill show foo.assembly
"ref:18e58778:/Users/lihaoyi/test/example-3/out/foo/assembly/dest/out.jar"
</> 2.24.scala
You can run the executable assembly to verify that it does what you expect:
$ out/foo/assembly/dest/out.jar
Hello World
</> 2.25.bash
Now your code is ready to be deployed!
In general, running Scala code in a Mill project requires a bit more setup than running it interactively in the Ammonite Scala REPL or Scala Scripts, but the ability to easily test and package your code is crucial for any production software.
2.5 IDE Support
The most common editors used for working with Scala programs is IntelliJ or VSCode. This section will walk you through installing both of them, but you only really need to install whichever one you prefer to make your way through this book.
2.5.1 Installing IntelliJ for Scala
You can install IntelliJ from the following website. The free Community edition will be enough.
Next, we need to install the IntelliJ Scala plugin, either via the loading screen:
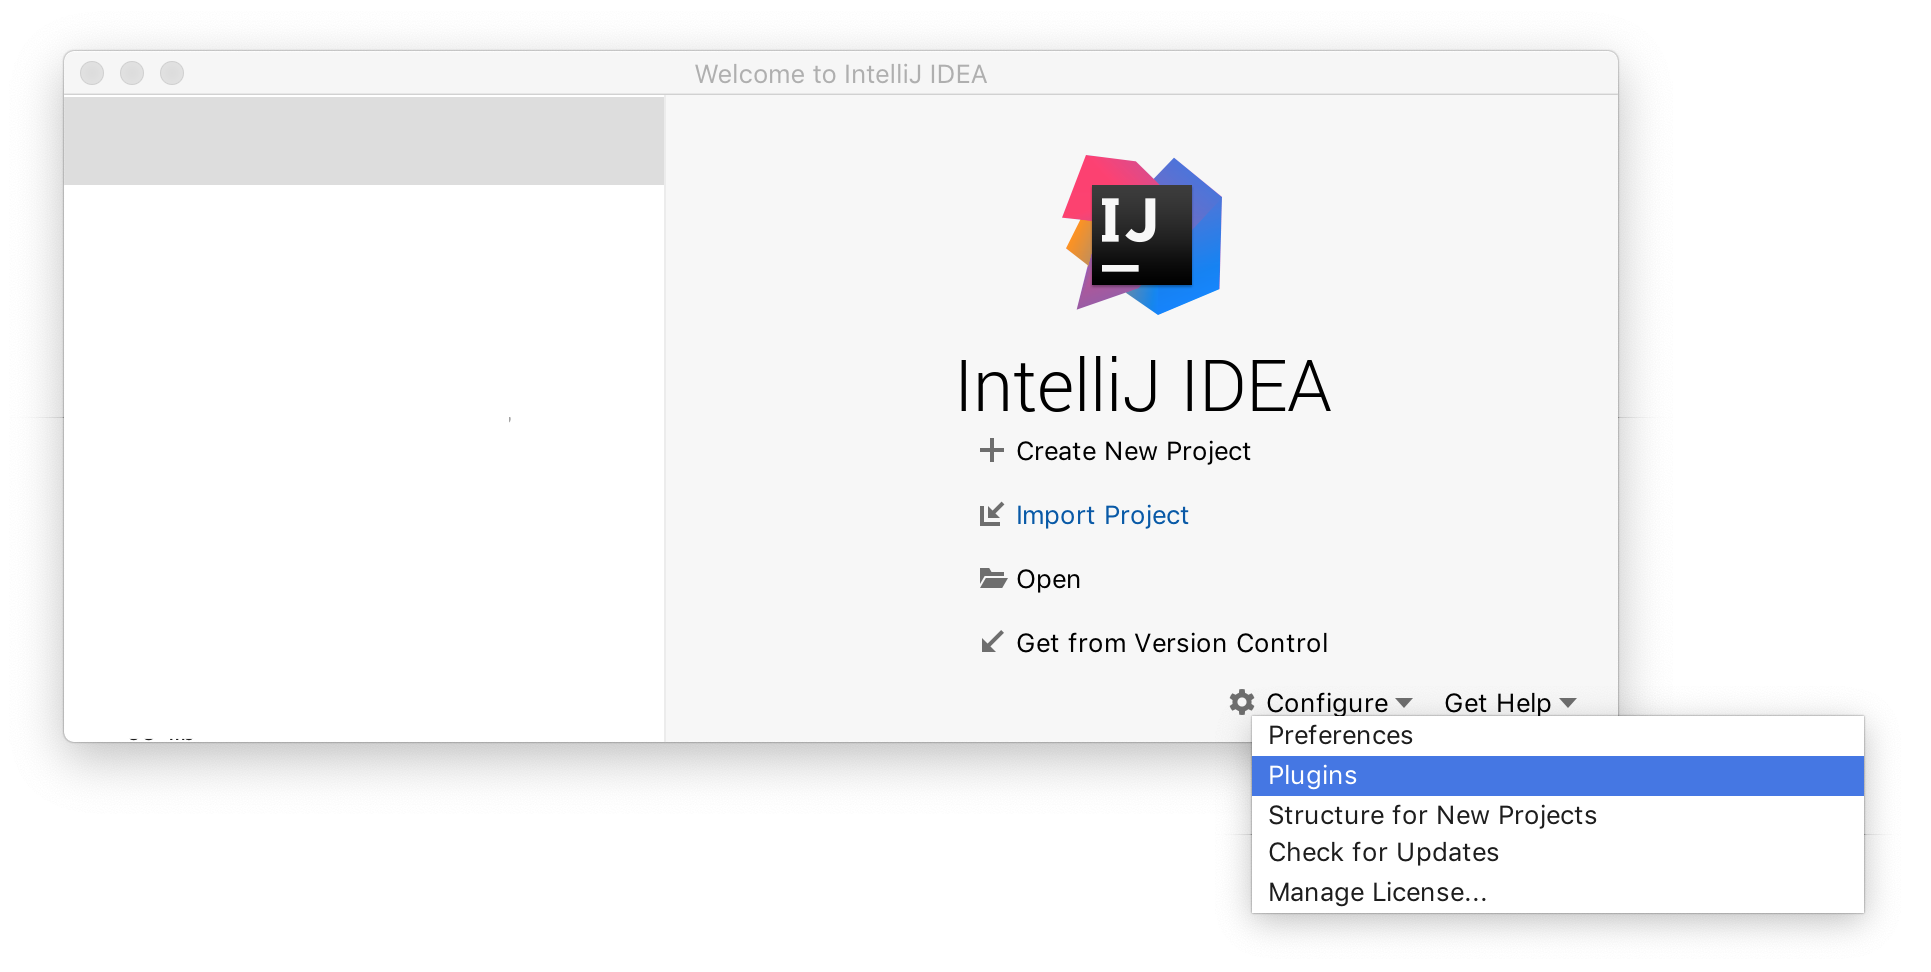
or via the menu bar
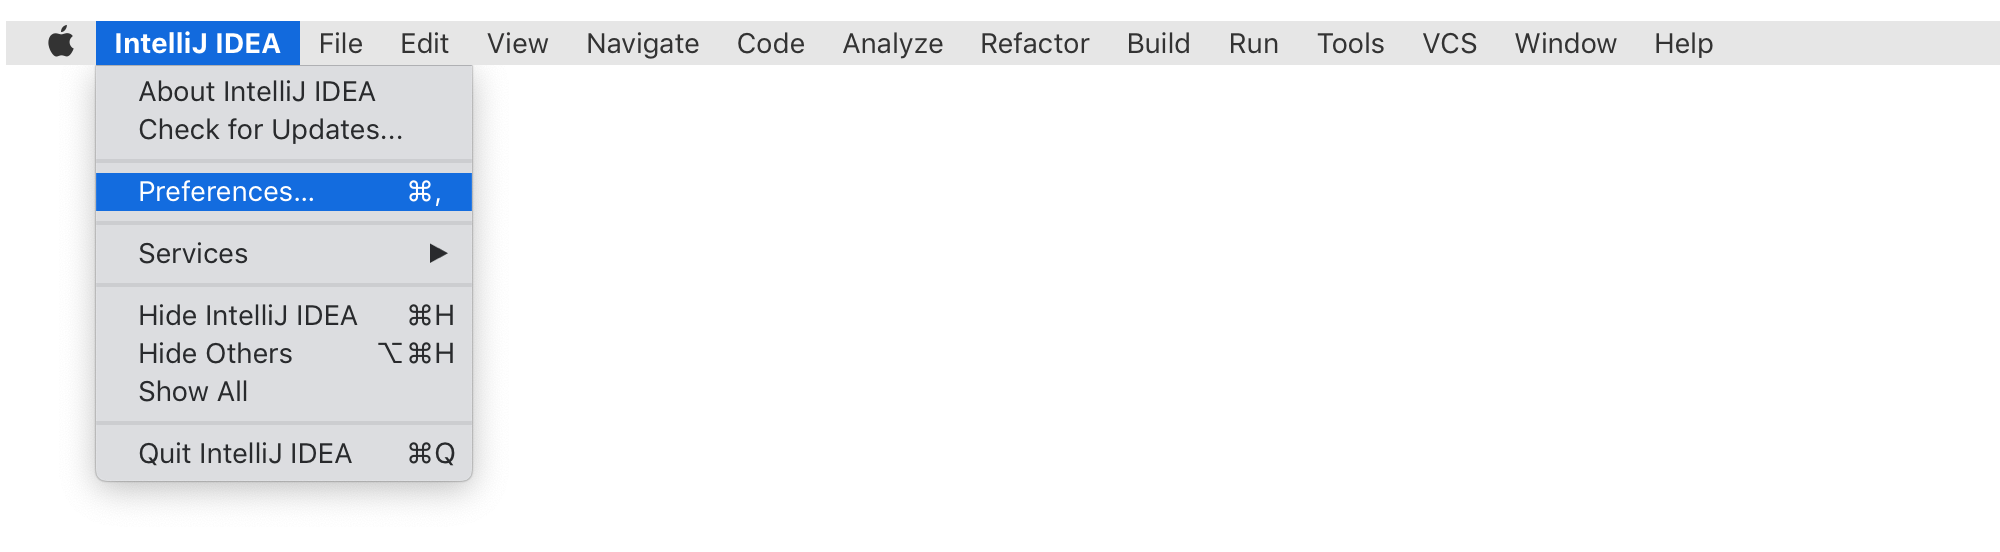
From there, go to the Plugins page:
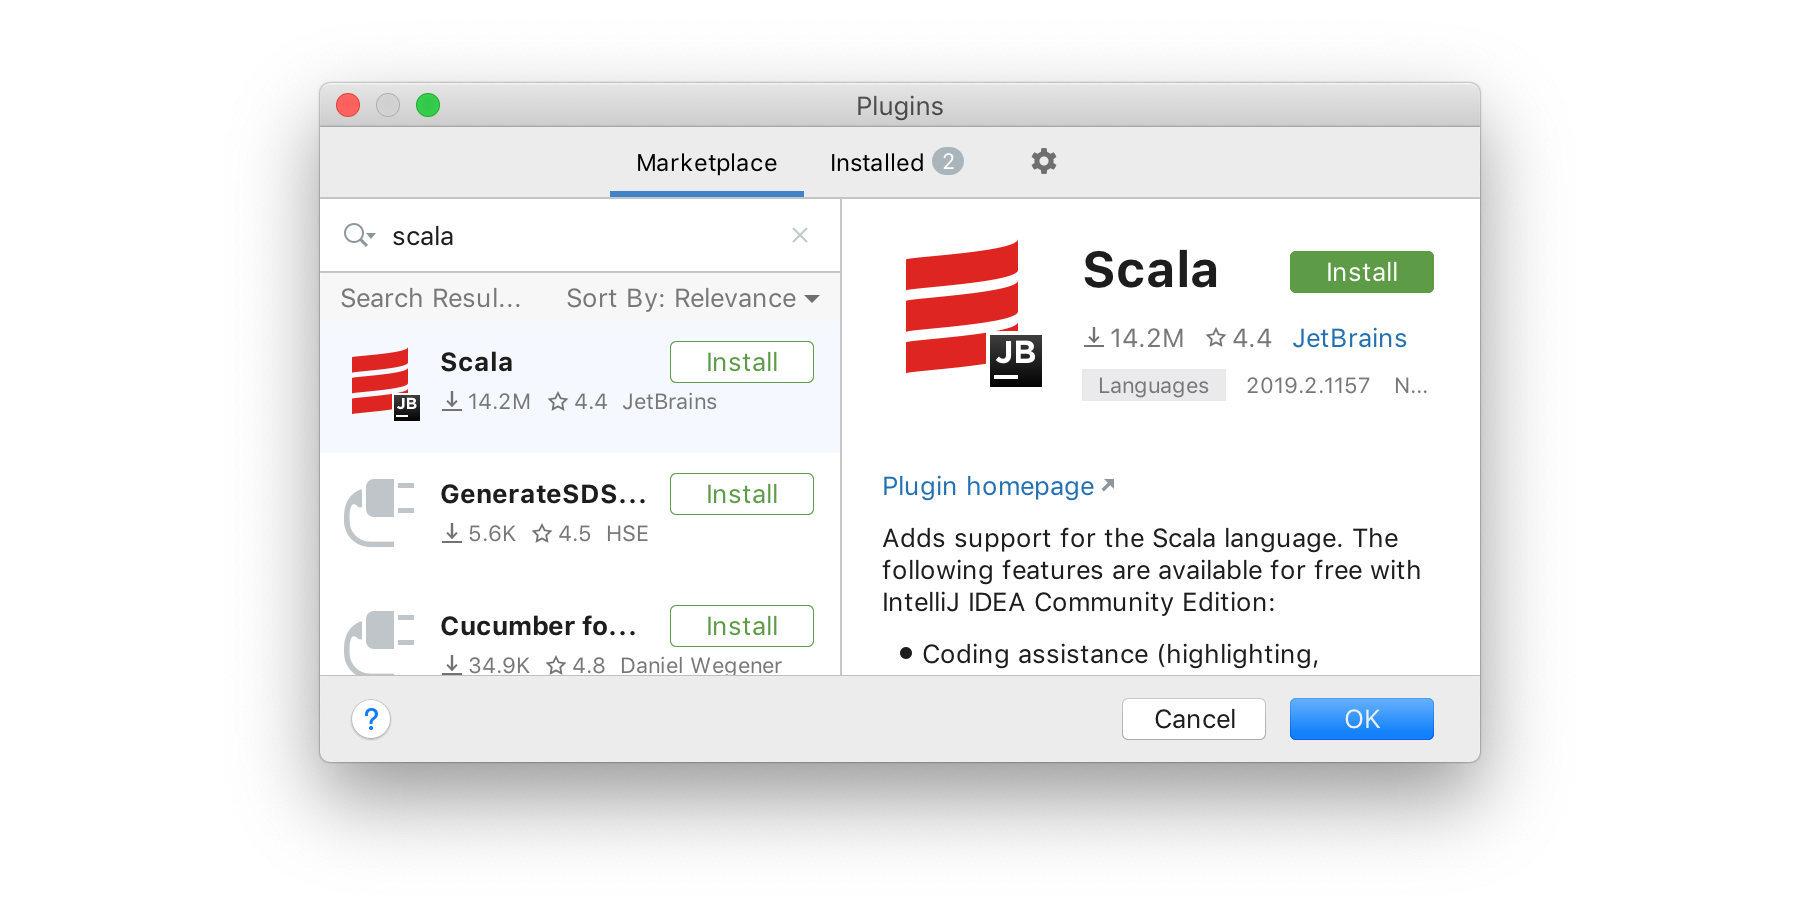
Search for Scala and click Install. You will then need to re-start the
editor.
2.5.2 Integrating IntelliJ with Mill
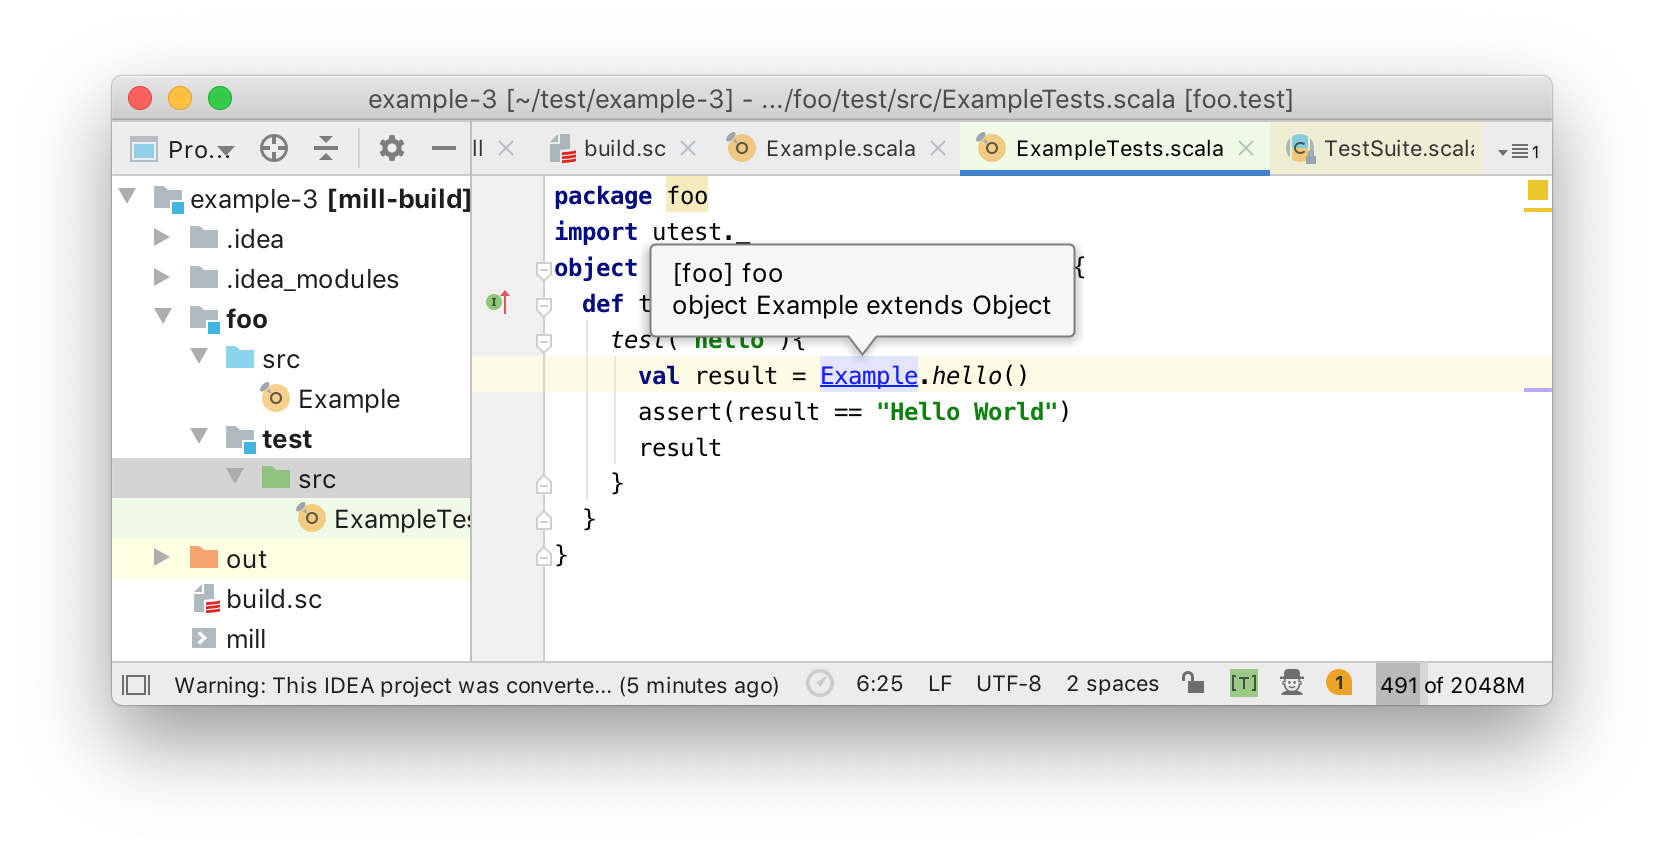
Once you have IntelliJ installed on your machine, you can load your Mill project via the following terminal command:
$ ./mill mill.scalalib.GenIdea/idea
Next, use IntelliJ's File menu item and select the folder your
/ Openbuild file is in. That will open up the Mill project, with IntelliJ
providing code assistance when editing all the code:.sc
You may see a Project JDK is not defined prompt: in that case,
click the : Setup JDKSetup JDK link and select the version of Java that you
installed earlier (2.2). Note that every time you make changes to
add dependencies or add new modules to your build, you need to re-run the
.sc./mill mill.scalalib.GenIdea/idea
2.5.3 Visual Studio Code Support
Scala also comes with support for the Visual Studio Code text editor, via the Metals plugin:
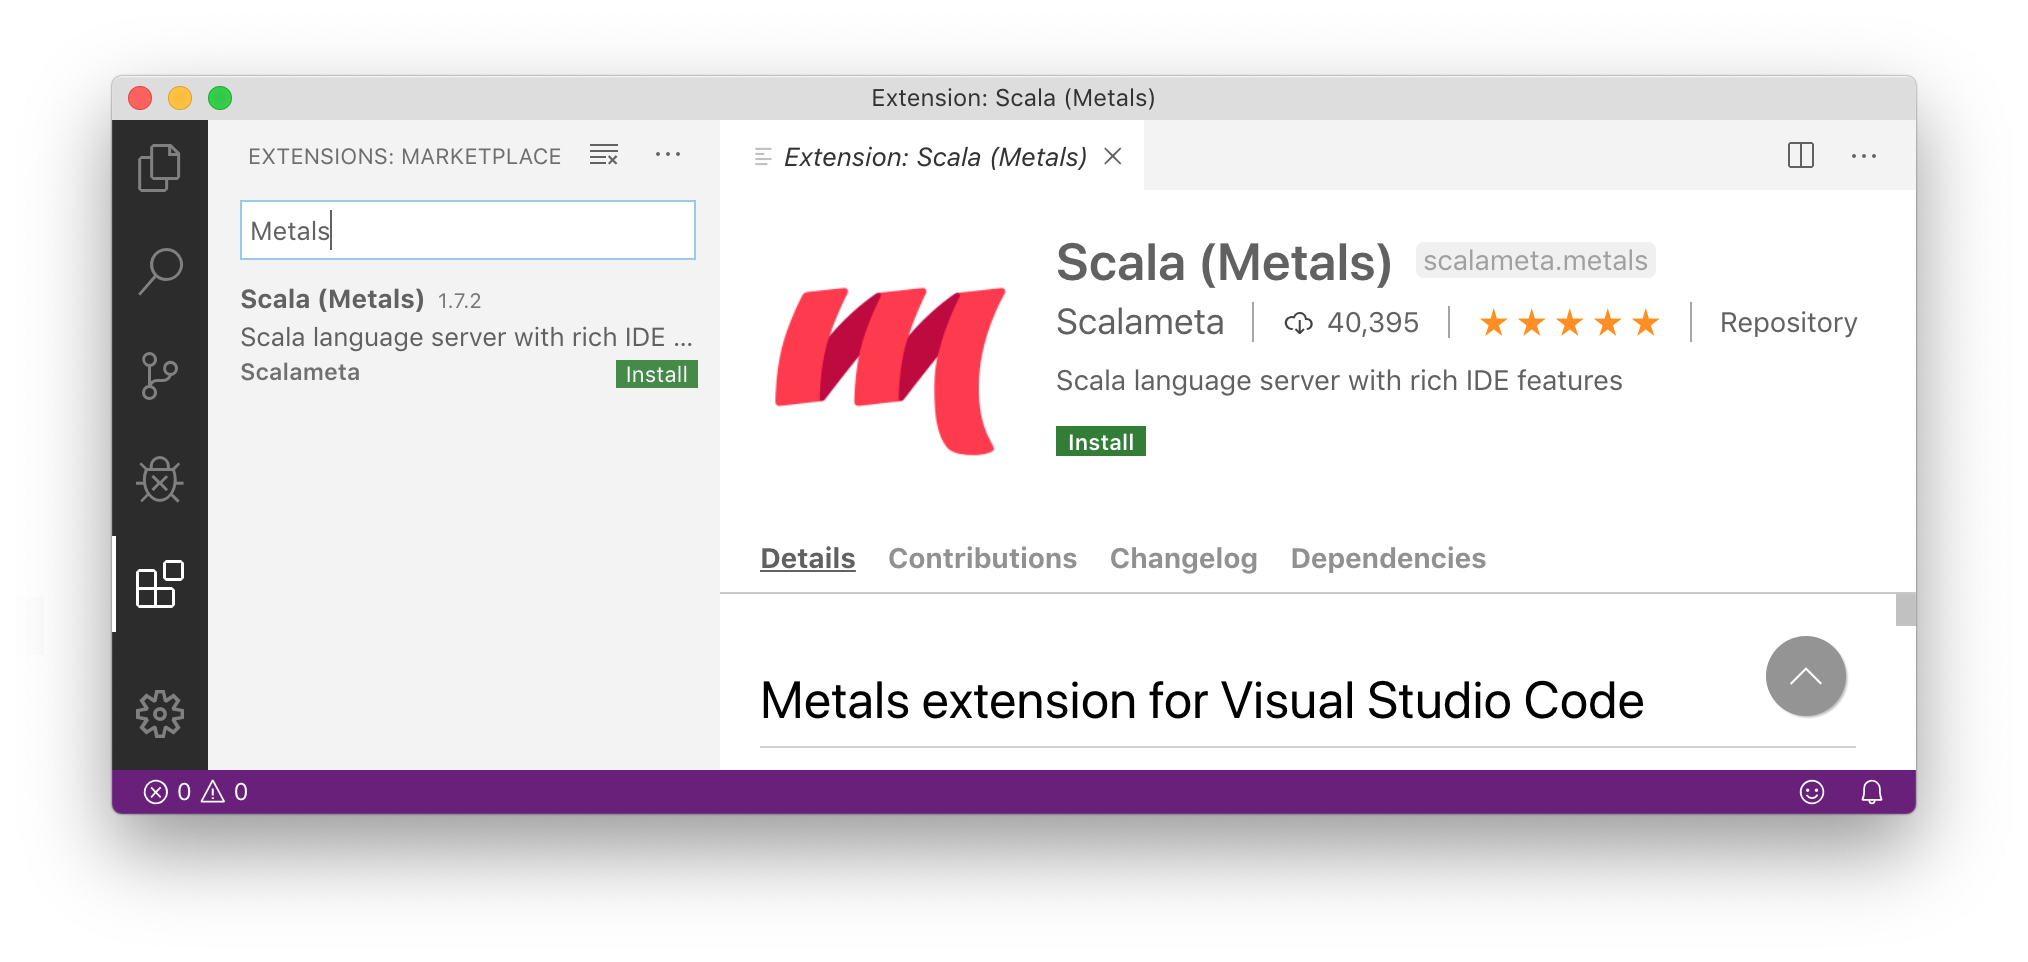
To use VSCode within a Mill build, we need to specify the Mill version in a
.mill-versionImport build:
$ echo "0.8.0" > .mill-version
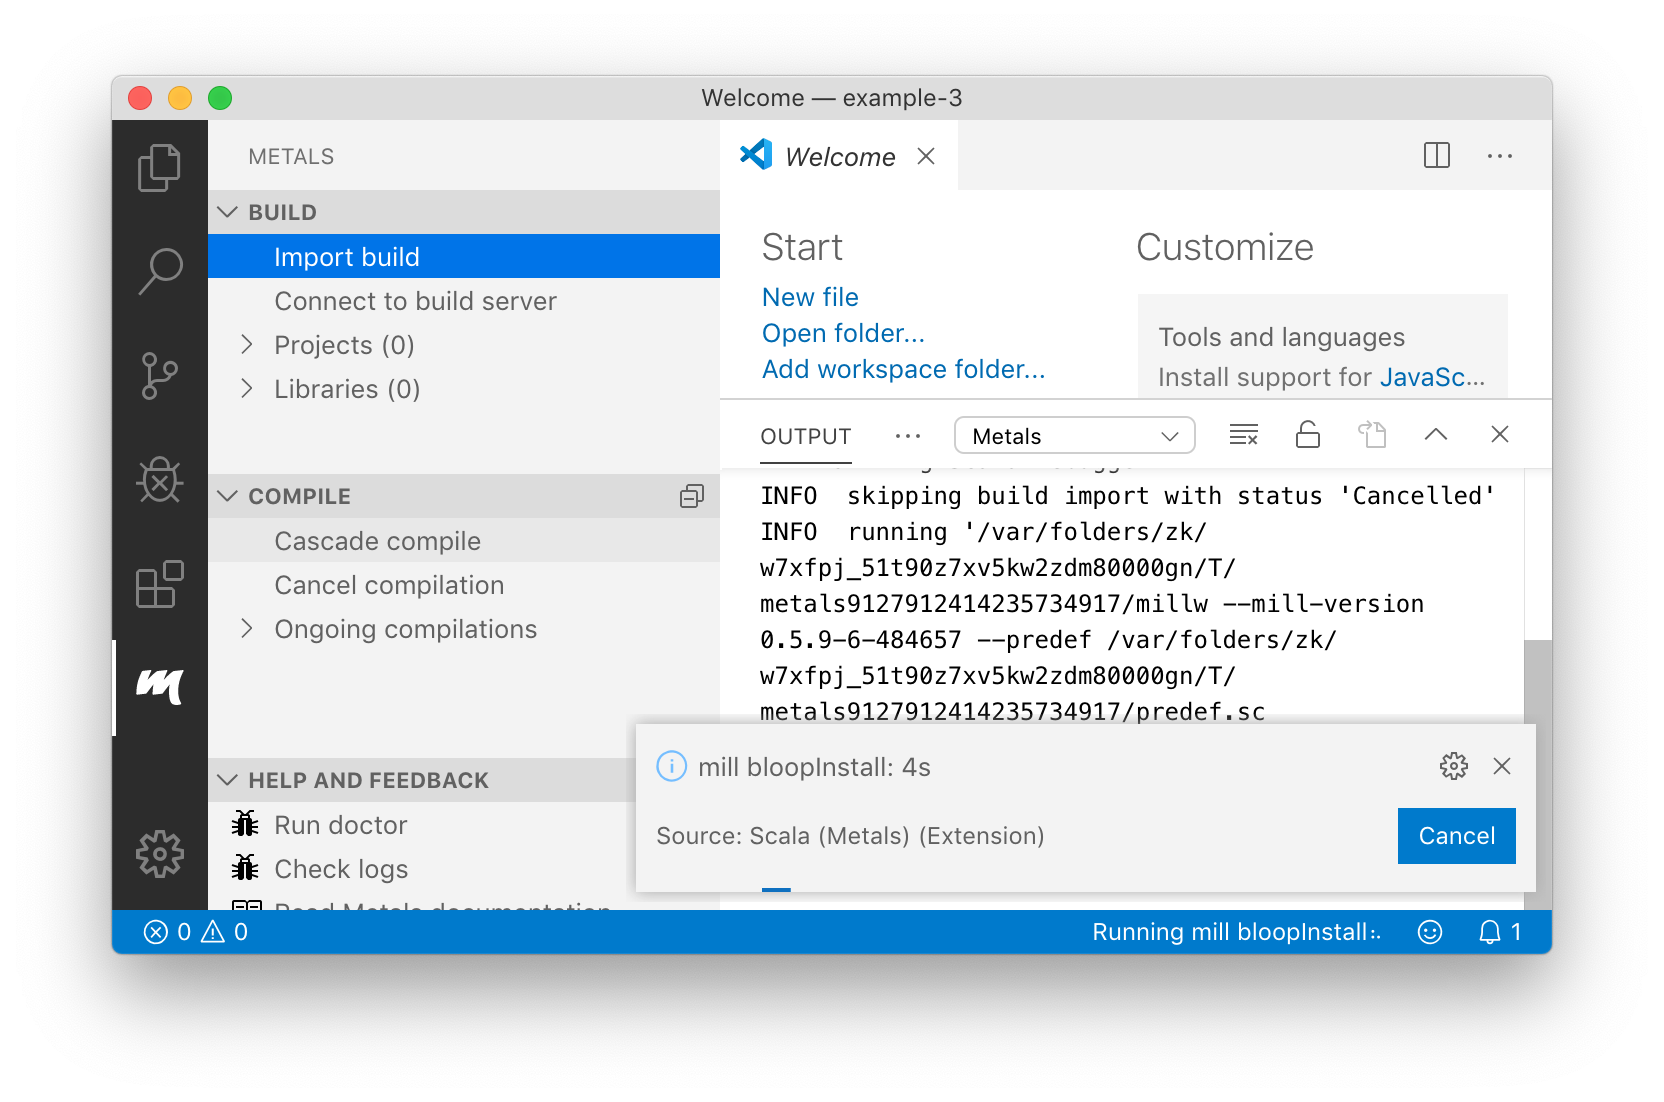
Sometimes the import may time out if your computer is slow or under load, and
may need to be retried. If you have trouble getting the import to work even
after retrying, you can try using a more recent version of the Metals plugin.
Use F1, search for Open Settings , and update (UI)Extensions e.g. to the latest SNAPSHOT version on the Metals/VSCode
website:> Metals > Server Version
You can also try enabling VSCode Remote Development, by using F1 and searching
for Remote. This will run the VSCode code analysis logic
inside the Ubuntu virtual machine, which may be more reliable than doing so
directly on the Windows host environment:-WSL: Reopen in WSL
Once complete, you should be able to show method signature by mousing over them
with Cmd or Ctrl.
Metals also supports other editors such as Vim, Sublime Text, Atom, and others. For more details, refer to their documentation for how to install the relevant editor plugin:
2.6 Conclusion
By now, you should have three main things set up:
- Your Ammonite Scala REPL and Script Runner, that you can run via
ammoramm myScript.sc - A Mill example project, which you can run via
./mill foo.run./mill foo.test - Either IntelliJ or VSCode support for your Mill example projects
We will be using Mill as the primary build tool throughout this book, as it is the easiest to get started with. You may also encounter alternate build tools in the wild:
- SBT: https://www.scala-sbt.org/
- Gradle: https://docs.gradle.org/current/userguide/scala_plugin.html
- Maven: https://docs.scala-lang.org/tutorials/scala-with-maven.html
Before you move on to the following chapters, take some time to experiment with these tools: write some code in the Ammonite REPL, create some more scripts, add code and tests to the Mill example projects and run them. These are the main tools that we will use throughout this book.